DIY


How to Start a Body Piece For a Cardboard Costume
In case you are just starting your costume, (like me) I wanted to show you that you can still get started with a cool cardboard costume and finish before Halloween (you will have to hustle). Although I'm going as a grasshopper, most elements are the same, I'll just be dealing with extra legs and antennae...
Just start with long cardboard strips, (mine are a rulers width), and drape them over the shoulders attaching horizontal strips as needed.
You can build a structure pretty quickly on which to start gluing cardboard skirt pieces and armor layers.
The rounded layers on the shoulders above are made by tracing a variety of bowls and plates, cutting them in half, then folding them and gluing them into place.
Really, it's not about the cardboard though, is it? It's about trying something new that you have never done before....it can make you sheepish. Well, I'm here to say: You can do this!
My inspiration: these incredible costumes from last year's challenge:
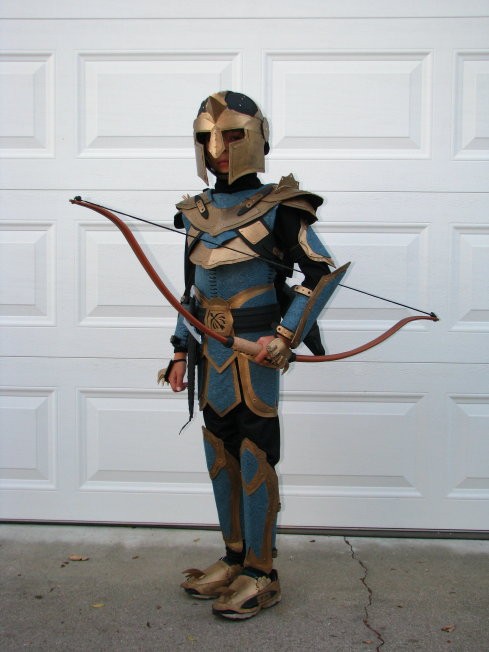
Archery Knight by Rachel and Tom Morgan

Cardboard Knight Costume by wrnking via Flickr

Costume Inspiration: Fraidy Zoo

This morning I got an email that made my heart leap into my green tea......The above pictures attached to an email from newly hatched author illustrator Thyra Heder.
Thyra's written a new book called, "Fraidy Zoo." It's about a family that makes a series of animal costumes (one for each letter of the alphabet) out of cardboard and other household objects in the attempt to find out which animal is scaring the littlest member of the family from going on a trip to the zoo. I was totally inspired by the illustrations and instantly charmed by the creative spirit of the family in the book and had to share it with you!

Just as excitingly, Thyra's in the process of building the cardboard rhinoceros from the book right now, but you really should visit her blog to see some of the photos she's posted showcasing some of the other cardboard creations she and her friends have made in celebration of the upcoming launch of the book.
Fraidy Zoo is coming out November 5th and you can find more info here: at Indibound or pre-order it via Amazon.

Butterfly & Moth: Sneak Peak
in Uncategorized, Costumes, Make
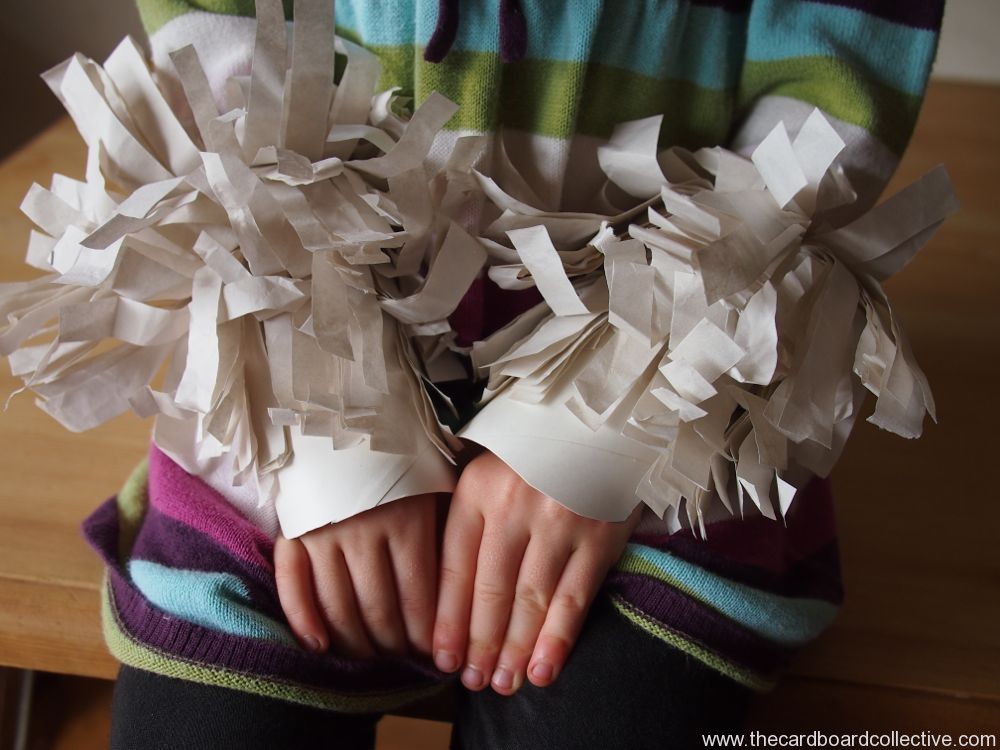
We've started to add elements to the cardboard hat pieces we made yesterday. Eyes are made from watercolor painted paper liners for shipping apples and citrus and the green fringe on the front of the moth mask is made from egg cartons...
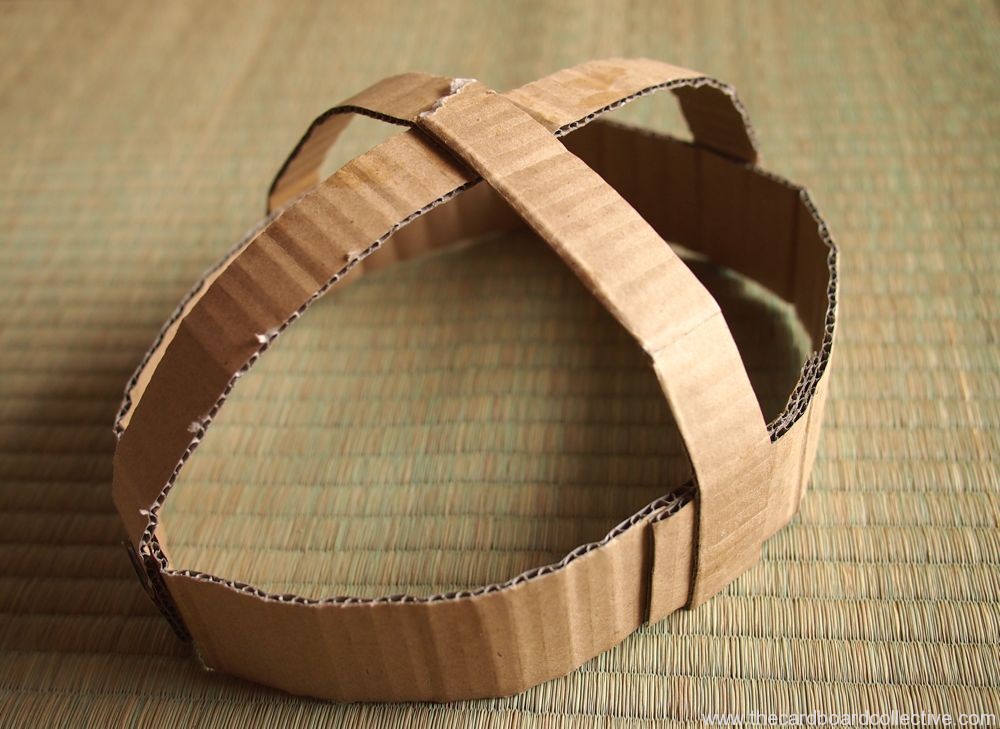
How to Start a Cardboard Head, Hat or Helmet
in Uncategorized, Costumes, Make


These are the beginnings of the head pieces the girls will wear for their butterfly and moth costumes. We will be attaching antennas and textured cardboard to complete them.
Simple Steps:
Cut strips of cardboard about 1.5" wide and longer than you need to wrap around your head.
Measure cut and glue a strip of cardboard together so it fits around your head.
Attach 2 more cardboard strips so that they cross over the mid point of your head.
Add additional strips as desired.
Use this base for attaching ears, horns, antennas, or a mask.

Cardboard & Newsprint Unicorn Costume
in Uncategorized, Make

To make the costume you'll need:
white paper egg cartons
white newsprint or tissue paper (rainbow colors would be great!)
toilet paper tubes
metallic cardboard, (or rainbow paint your regular cardboard)
stapler
Simple Steps:
cut a rectangular strip of cardboard about 4 inches wide and 10 inches long
fringe newsprint, then fold the ends over the cardboard and staple
cut ears from egg cartons and attach with stapler
create cone shaped horn from metallic cardboard and staple down
cut toilet paper tubes so that they can fit over your wrists and ankles like a cuff
fringe more newsprint and staple to cuffs (place tape over staples to avoid irritation)
shape the ends of the toilet paper tubes to look like hooves.
More Cardboard Heads
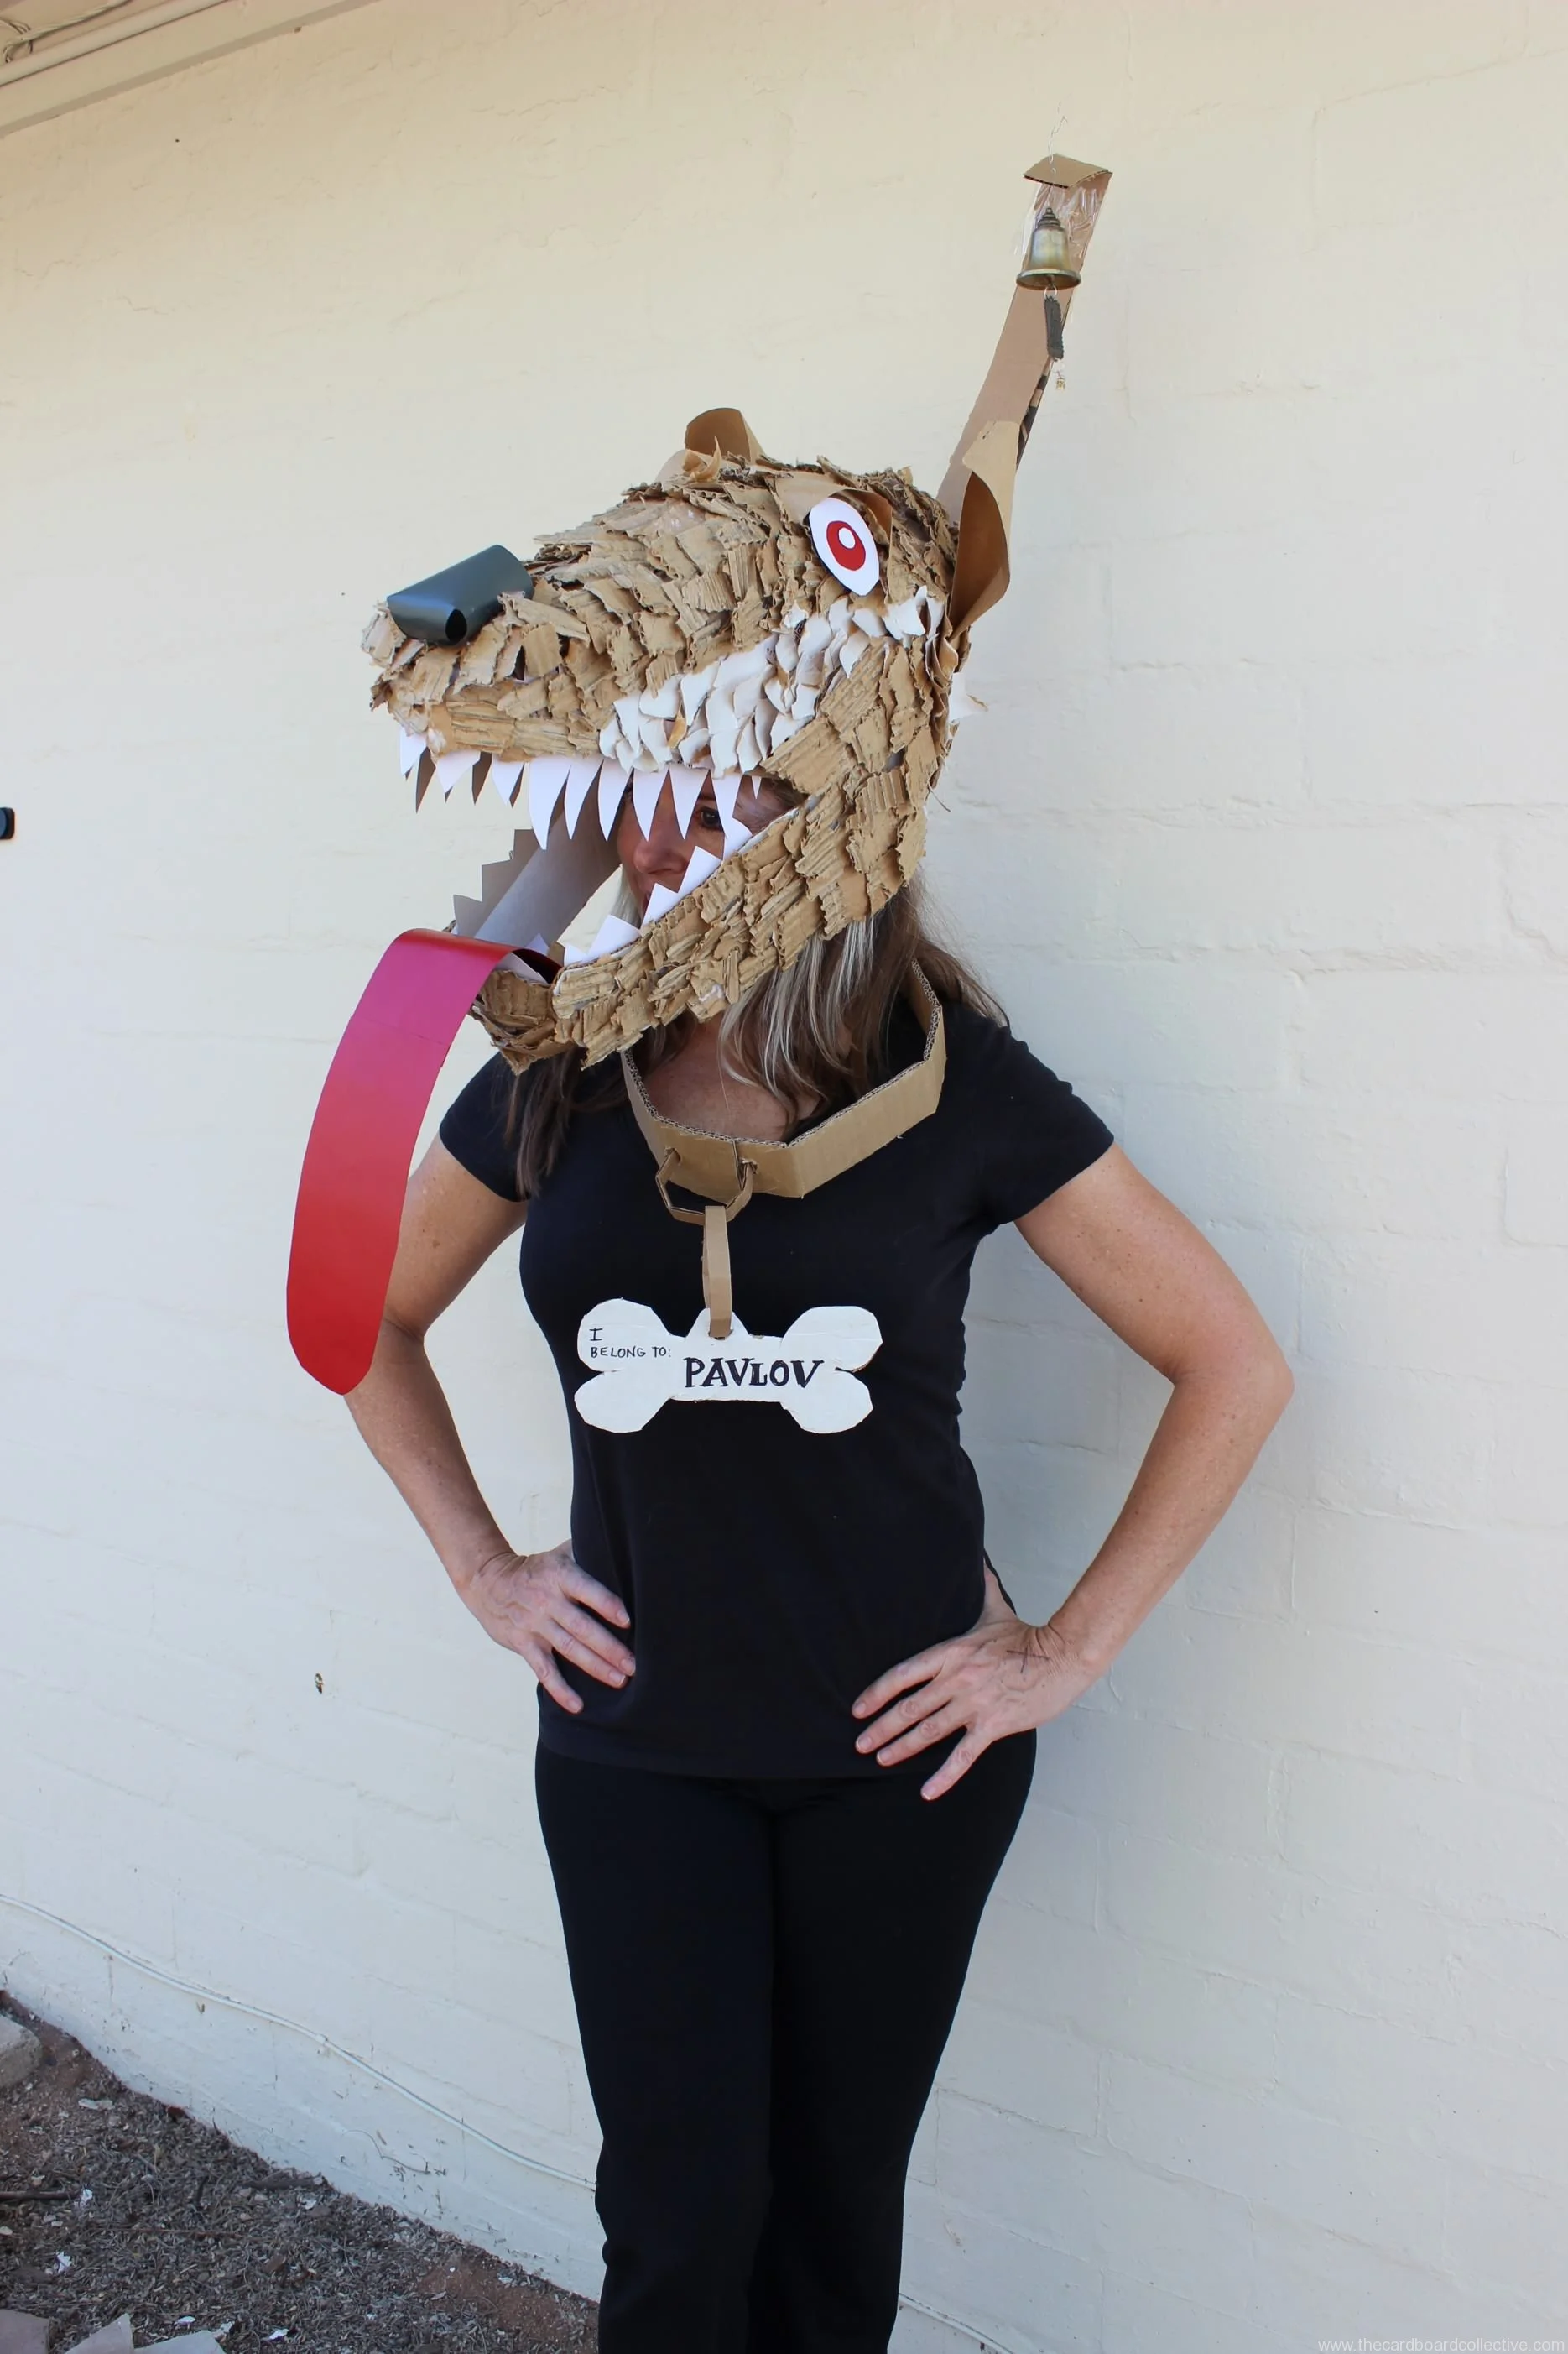
We've already gotten our first photos for the Cardboard Costume Challenge!
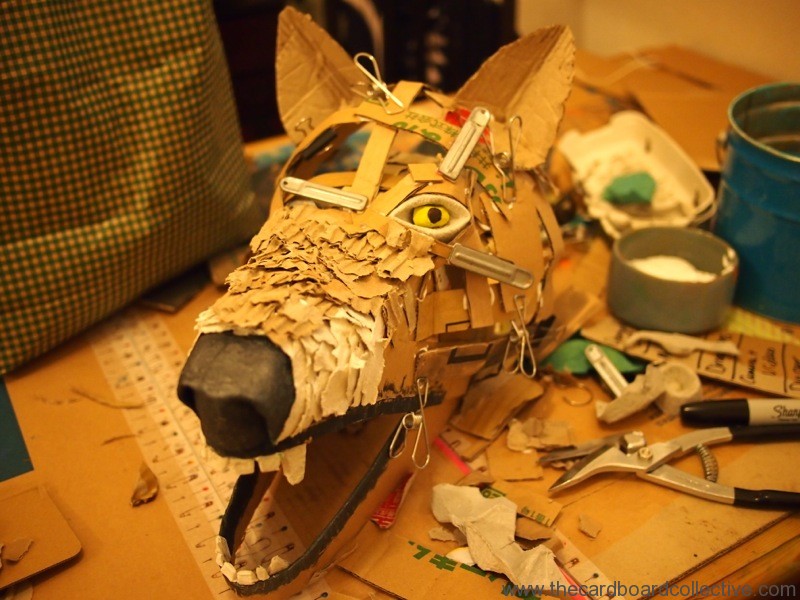
Christine Scheer made this incredible Pavlov's Dog head entirely from cardboard for a cardboard costume charity event she attended in late September.
You can see how Christine started her head by making the upper and lower cardboard jawbone pieces and then used strips to connect the pieces.
This a truly original costume idea! Thanks for sending your awesome pictures Christine!
Cardboard Costume by Christine Scheer
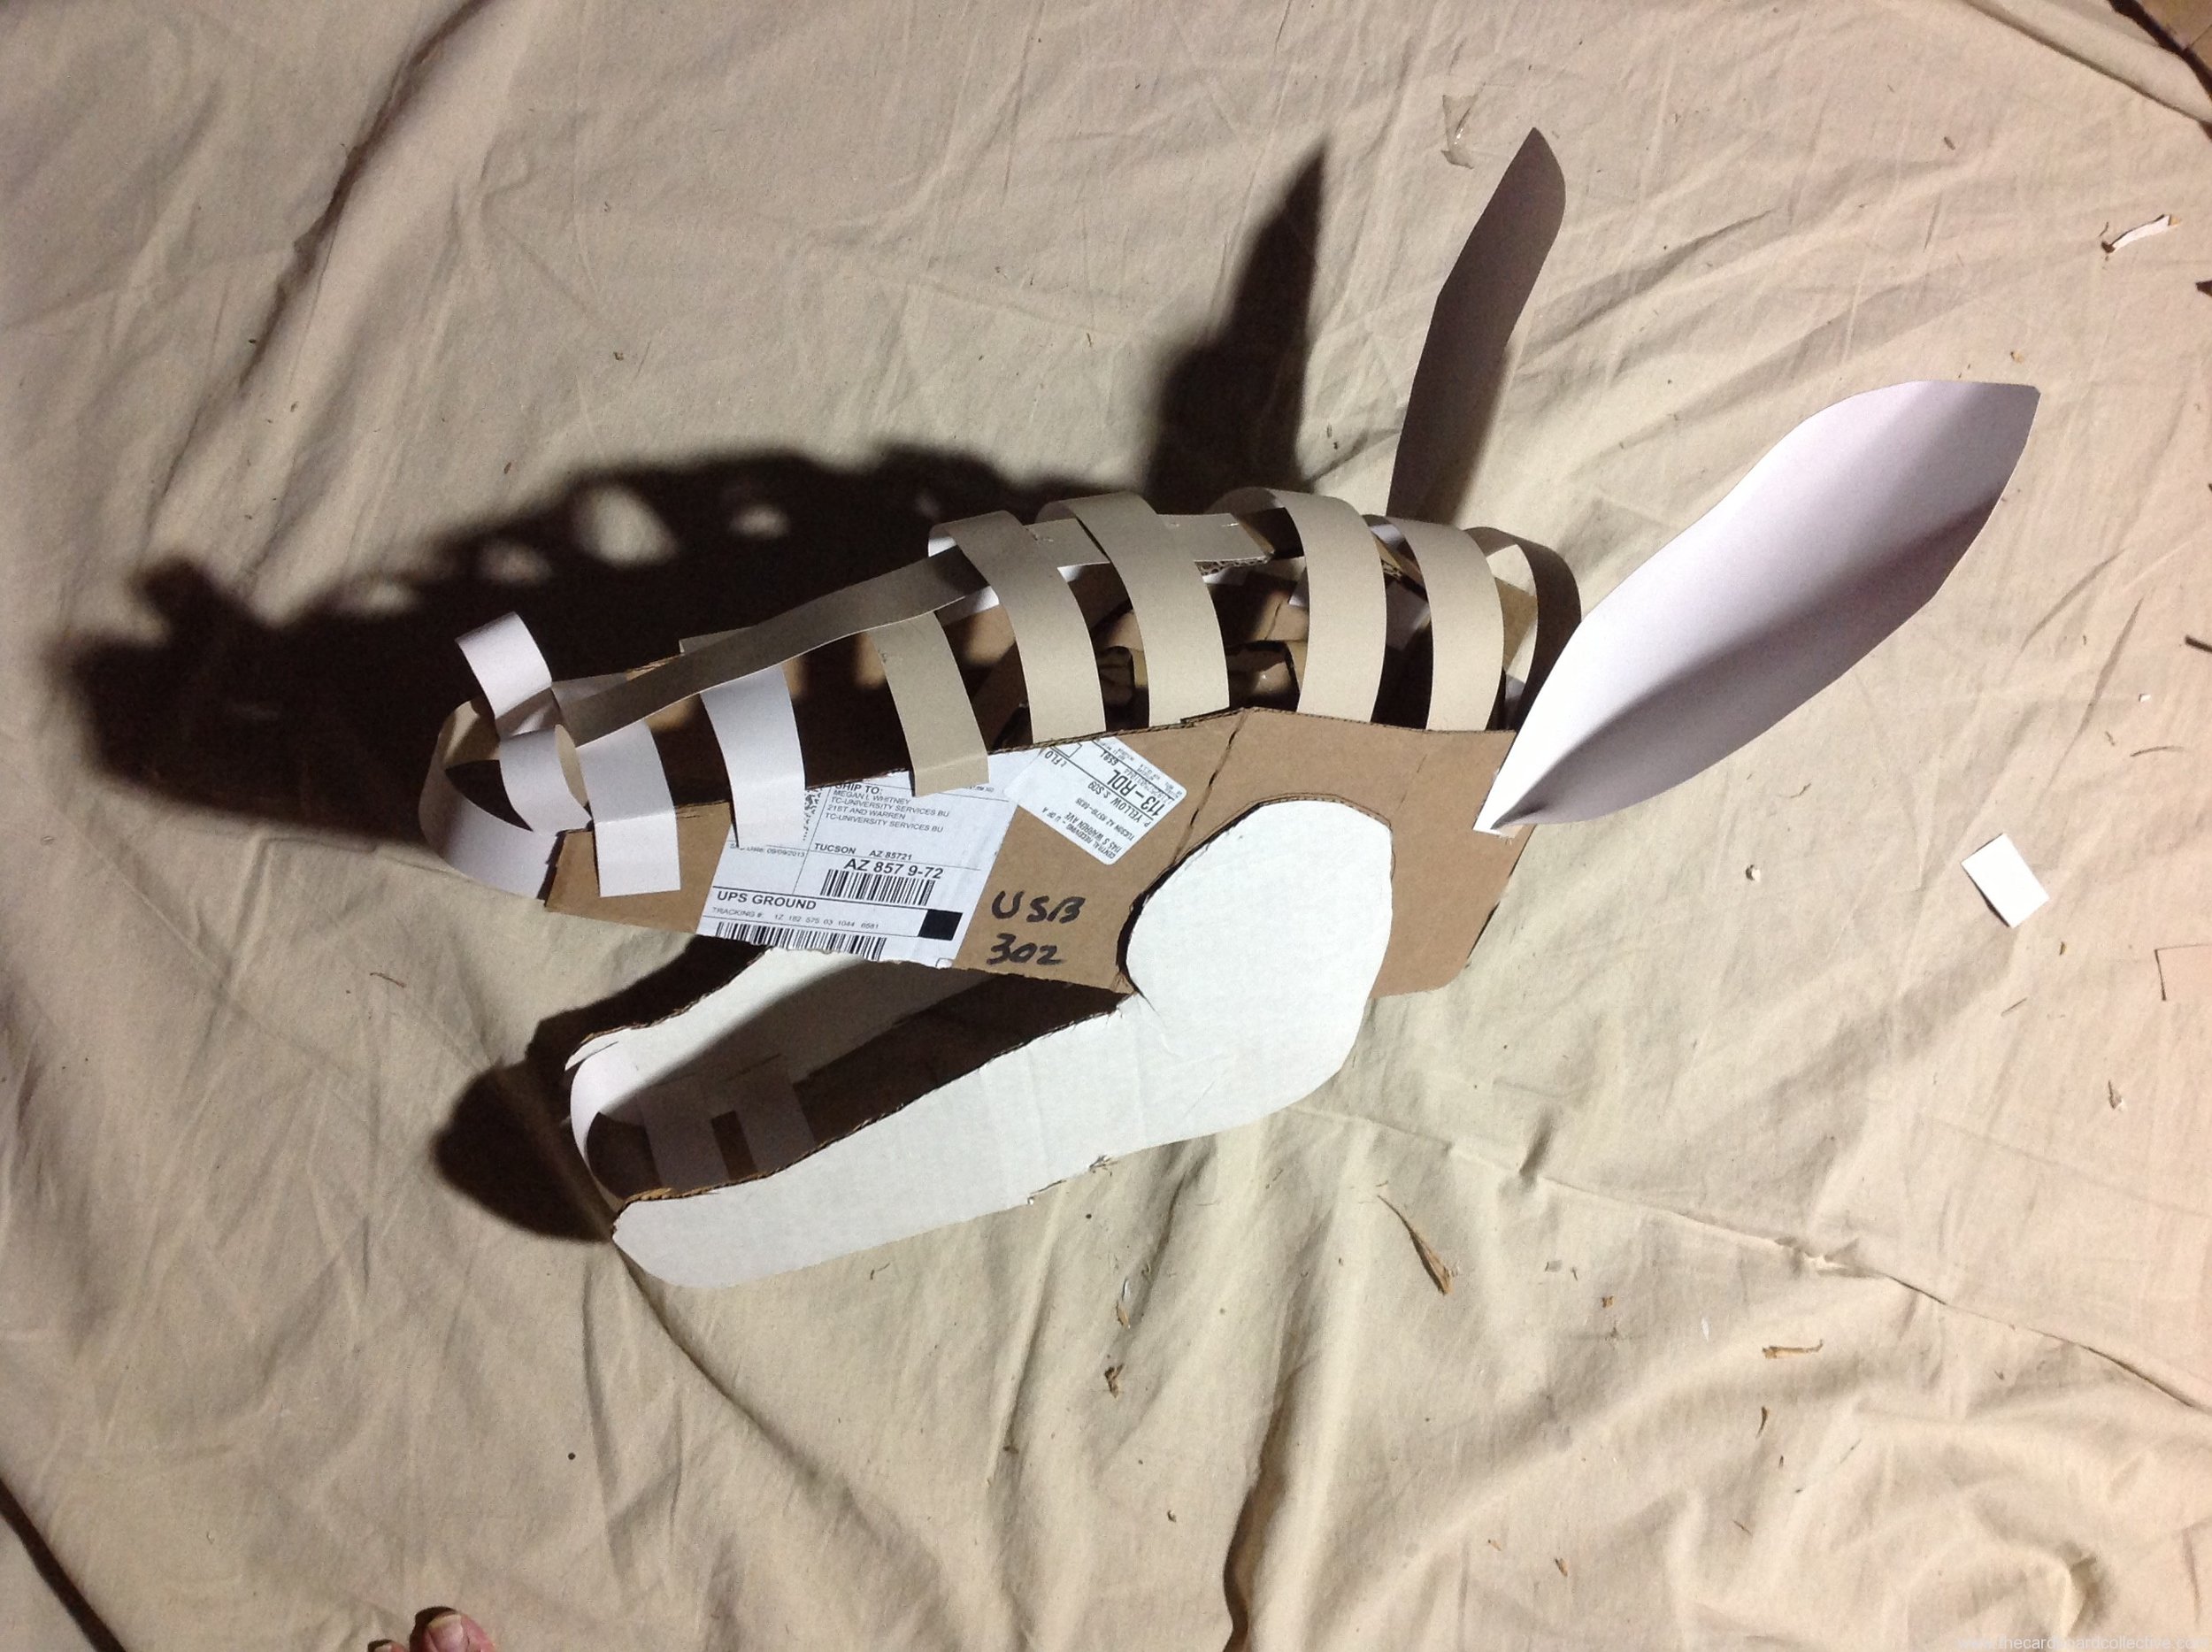
Cardboard Heads
If you're thinking about making a cardboard headpiece for your Halloween costume, this weekend is the time to get started! Last Year we created 2 different kinds of cardboard heads, using two different methods.

The first head was for a chameleon costume, and utilized the hood pattern for sewing a kid's jacket. To read the post about adapting a sewing pattern for use with cardboard, click HERE
The second head was built by making a cardboard skeleton and then gluing down layers of ripped cardboard. You can see more pictures of the development HERE.
Because every cardboard head is a little different, I'll lay out the most basic steps so you can get started. Have fun and experiment, the point is to develop you're own style...
Make a cardboard band that fits snugly around your head.
Create cardboard side pieces that are similar in shape to the skull of the creature if you look at it sideways.
Glue or staple the pieces to the cardboard band.
Use cardboard strips to connect the side pieces and shape the front of the creature's face.
Cover your cardboard head with crumpled up and flattened out copy paper, fringed newspaper, Kraft paper, torn pieces of egg carton or ripped pieces of corrugated cardboard. You can take a look at the Cardboard Costume Pinterest Board for more inspiration.
Here's a great video by John Gleeson Connolly (via Apartment Therapy) talking about how he made a simple cardboard dragon head for his son's Halloween costume using a similar method. http://vimeo.com/51576209
10 Tips for Cardboard Play Day
in Uncategorized, Workshops, Play

The Global Cardboard Challenge is here again! Will you be joining THE WORLD on October 5th, 2014 to either play or host an event?
For everything Caine's Arcade and The Global Day of Play, please be sure to check out The Imagination Foundation's excellent website and resources.
I'm also excited to be planning my own event in collaboration with a local adventure playground here in Tokyo! More information to come, but until then I want to share some of my insights from hosting 5+ events last year.......
*10 Tips for Cardboard Play Day*
1. It's all about the cardboard!
Provide a wide variety of cardboard! Shoe boxes, small boxes, over-sized boxes, cardboard tubes, and whatever other reclaimed materials you've collected all add to the diversity and creativity of what kids create.
A rule of thumb that I follow is 1 square meter of cardboard for every 20-30 kids
2.Don't let cardboard get unruly.
Cardboard + kids can = chaos!
Keep the cardboard upright if you can (as if each piece were a book on a book shelf.) That way there is thought in selecting the cardboard and it doesn't get kicked around and stepped on.
It's even more helpful to organize your cardboard by size. (Think of a lumber yard.) Kids often know what size materials they need and if the cardboard is organized then kids won't have to spend time rooting around through big piles to get what they want.
3. Give them tool boxes.
Tool boxes allow kids to be mobile and have everything they need to build whatever, wherever, with whoever.
A tool box can be as simple as a shoe box, or a cardboard six pack.
Provide a place that is clearly marked for kids to return tool boxes when they're finished working or ready to leave the play day.
4. Provide a secure area for kids to keep their stuff (i.e. coat check).
Kids easily loose track of their new friendship bracelet, cell phone, hooded sweatshirt, etc.
Create a place (as simple as a "drop" pile), or even better an informal system like a coat check, for keeping track of kids' things so they can focus on building and collaborating with their friends, and you can alleviate the hassle of having to help them search for their lost items.
5. Keep the organizer free.
If you are organizing a cardboard play day, recruit enough parent volunteers to assist kids so you're free to trouble shoot any problems that might pop up.
Parents get excited and often want to share or ask questions. If you're responsibility is to supervise kids, you may be torn between providing adequate supervision and having a great conversation with a future cardboard enthusiast.
It's also helpful to have a volunteer that is solely devoted to taking photos so you have some great shots for promoting your event next year.
6. Provide a theme/give permission
Telling kids that they can build whatever they want is exhilarating for some and overwhelming for others.
Providing a theme a invites collaboration and helps kids narrow their focus....
We're building a village....
We're building a cardboard maze....
We're making cardboard costumes....
We're making an arcade....
It's a cardboard ocean!
Some kids need permission to create and many just want to be told it's OK to be creative and let loose. Indulge them! This is their time to think big and we want to encourage them in any way we can.
7. Give kids real tools.
It's important to gauge your audience, (parents kids and the host institution) when deciding what kind of tools you're going to make available to participants. I prefer to always give kids "real tools" as opposed to dumbed down versions that can cause frustration. In the real world, however that's not always possible.
If kids are only allowed to use safety scissors and plastic saws, try arming your adult volunteers with more professional tools that can help finish the job. These are the tools I've found to be most effective and in my opinion entirely kid-friendly, but they require instruction and adult supervision:
Phillips head screw driver
scissors
cordless drill
8. Use reusable fasteners.
To build really cool, big stuff out of cardboard you need some kind of fastener to hold everything together. (tape and hot glue just don't cut it!) There are 3 that stand out in my opinion, based on their re-usability AND functionality.
MakeDo
re-usable zip ties
nuts and bolts
All of these fasteners have different price points and advantages and disadvantages, so I really recommend getting a few of each and test driving them at home before your event.
It's really helpful to show participants how the fastener you're using works when kids arrive, so keep some supplies in your pocket to quickly demonstrate as you greet new arrivals.
9. Have an exit strategy.
Sometimes kids are so excited at cardboard play day, they can't stop building! Givie kids a heads-up starting 30 minutes before cleanup, so they can get focused on completion and get ready to say goodbye to their creations.
Make sure you have a plan for recycling your cardboard. I was once left in a terrible position at a play day, when the organization that donated the cardboard said they could no longer take it back! I had to haul it all back to my home by bike and then put it out for recycling over a course of several weeks!
If you haven't prearranged volunteers for cleaning up and bundling cardboard at the end of your event, a clipboard signup is handy when participants arrive and usually provides you with enough hands to finish the job.
10. Get feedback.
This is something new I'm hoping to try this year; a one sentence question for kids as they're cleaning up or heading out.... you could also try a paper-pencil survey or even a simple high five?
What would you build next time?
Is it more fun to work by yourself, with your mom and dad, or with a friend?
What was the best part about today?
Have you ever made/built something like this? Why/Why not?
See you next year?

DIY Cardboard Camera
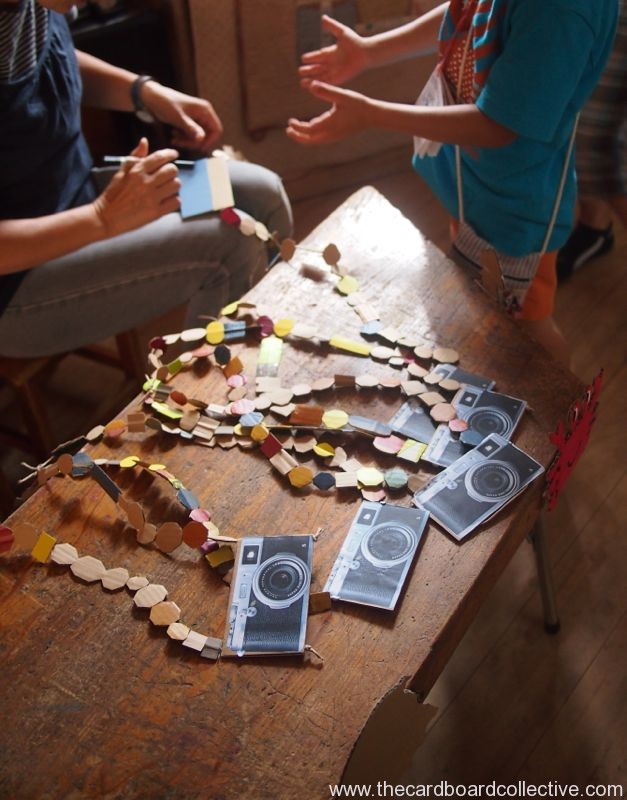
There are so many adorable ideas for cardboard cameras on the internet, but this one comes from the first post I ever published on The Cardboard Collective about cardboard beads. When I got my new camera, I had the paper camera brochure left over, and glued it to some cardboard. We strung it with some cardboard beads on paper twine to make one of the more popular items in the girl's jewelery box.
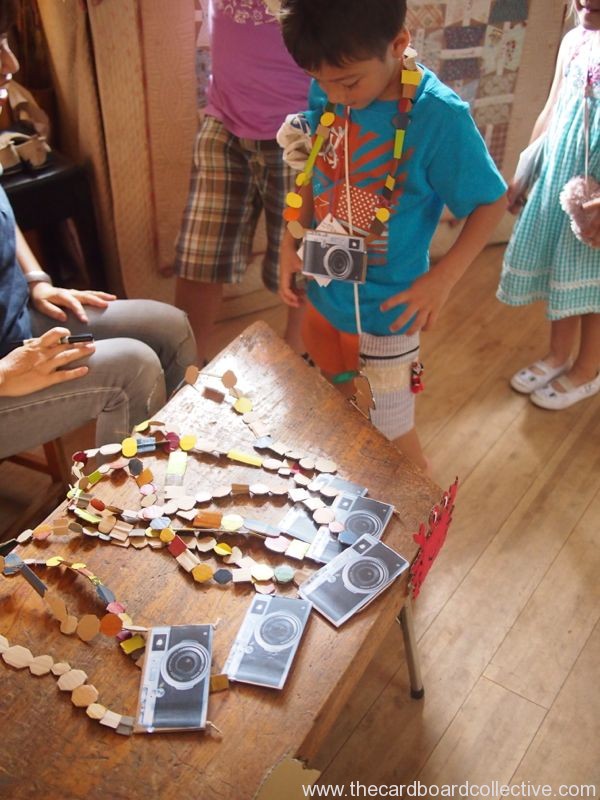
Recently I joined up with about 15 other mothers from my daughter's yochien (Japanese preschool) and we made cardboard camera necklaces for all the kids at her school. The cameras were a prize from our fishing booth at the summer festival.
It was SO fun to see the kids snapping photos of each other. Since most of the parents were also walking around with their cameras slung around their necks, there was the slight excited air of a press conference announcing the magic of summer; more kiddie pools and popsicles to come....

Some of the kids know I helped make the cardboard cameras, so it was cute when they pretended to take my picture. A sweet way of trying to communicate and be playful with me. Of course I love kids AND cardboard, so I was pretty smitten the entire day.

Say "チーズ!"
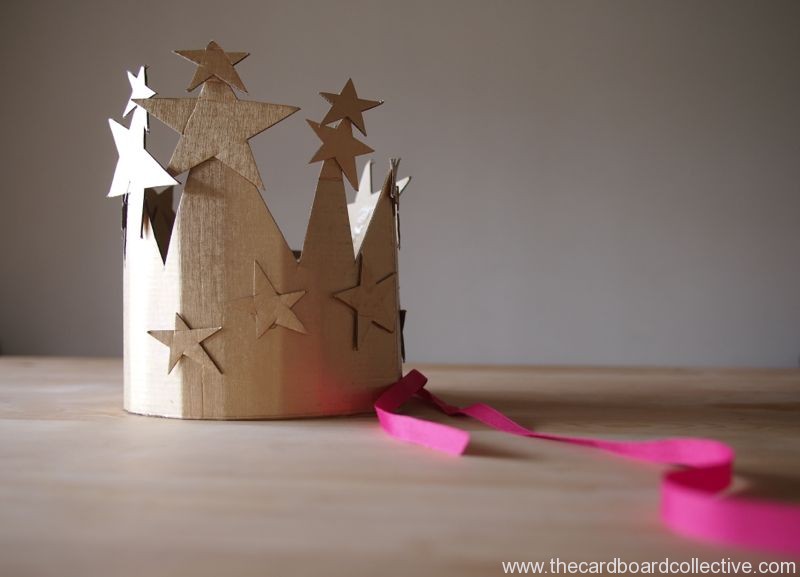
Starry Cardboard Birthday Crown
in Uncategorized, Costumes, Make


An easy beautiful birthday crown that my daughter put together on her big day. She wants to wear it again next year, and I agree it turned out beautifully. There is definitely a Glinda, Good Witch of the North quality there.
If you can't find gold cardboard, try jarred gold paint and pizza box lids........

Paper Bag Hat
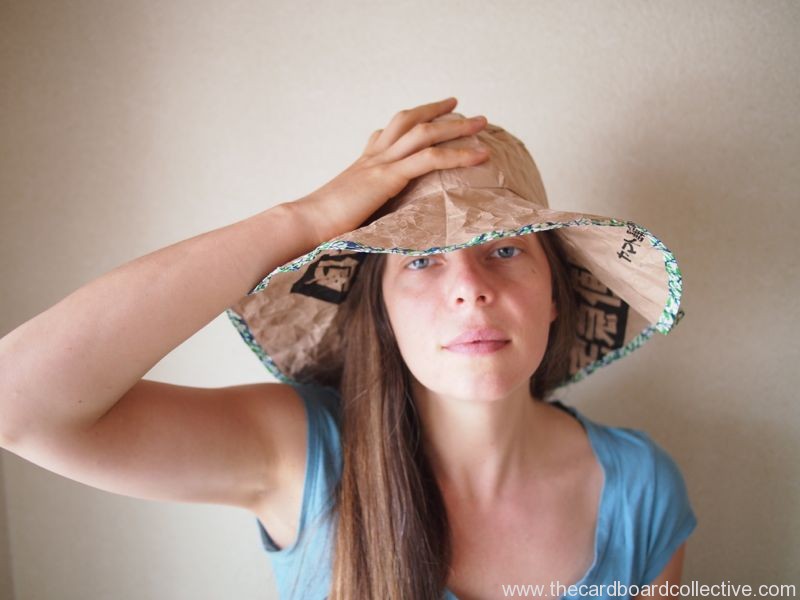

I'm literally AND figuratively wearing a new hat these days.
Two actually. The first one is a partnership with the Japanese company eco+waza, which puts out a magazine and sells eco-friendly products from Japan. I'm designing cardboard projects for their packaging, (a cardboard box) and I'll be posting a few of the projects here on The Cardboard Collective in the coming months.
The second is a project working as the Japan correspondent for Playscapes, a blog about the world's best playgrounds. As you know I'm raising two eager young playground testers, and love play and design, so what better job is there? Find the most beautiful, inspiring and creative playgrounds near you HERE.
As for the paper bag hat that I'm wearing, I created it from a brown Kraft paper bag with this pattern by Angellea Designs. As a fledgling pattern designer myself, I have to say this pattern is just excellent. I made paper hats for the girls too, and they are going to provide perfect full sun coverage when we're out foraging for summer berries this year. Although this hat isn't water resistant, a sun hat is meant to be worn in the sun, and what hat could be lighter and easier to fold up?
I didn't do anything special to sew the paper hat other than use the longest stitch length on my machine and add a bias paper trim to the edge. They sew up really fast, since there's no lining, and hey they're just fun.
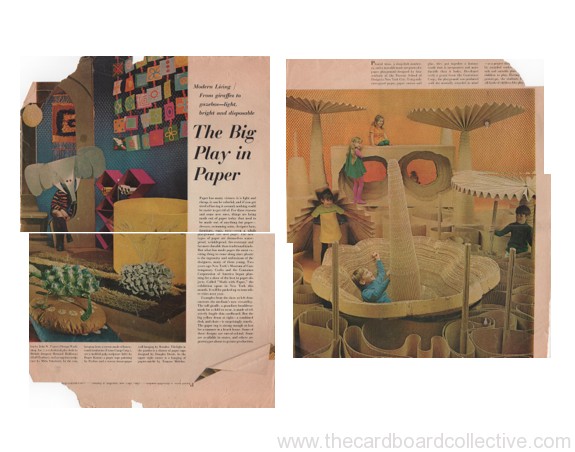
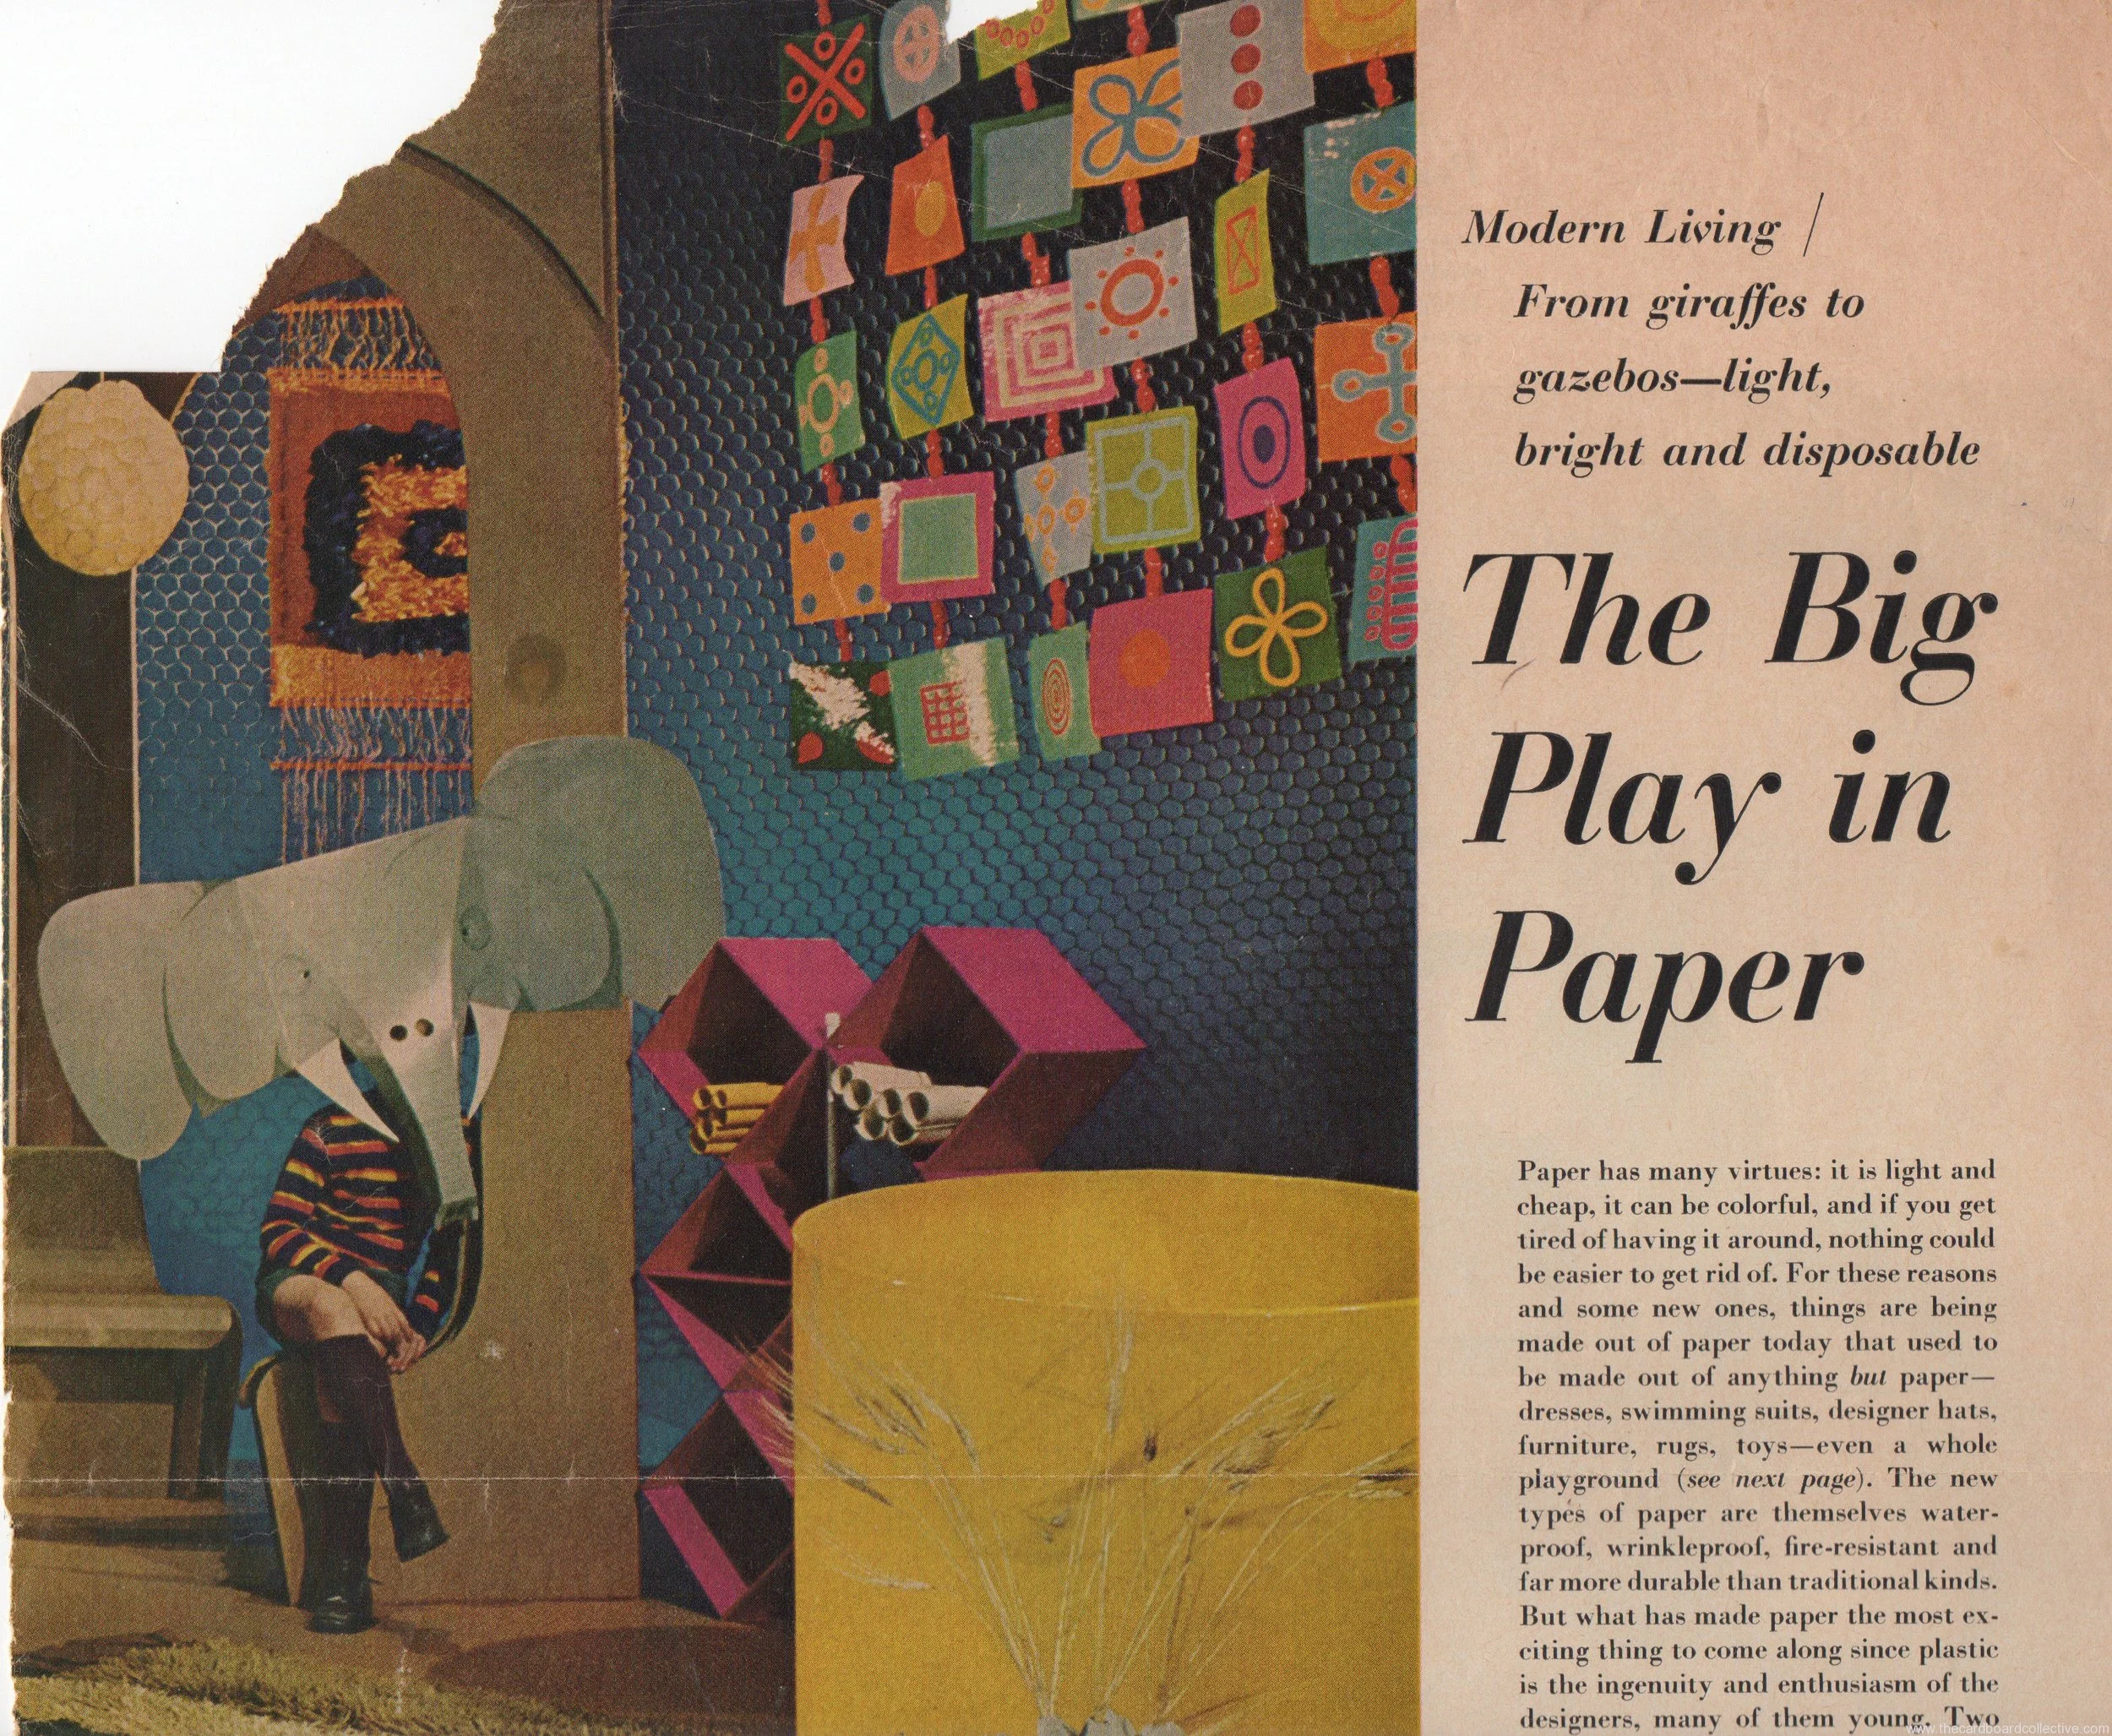
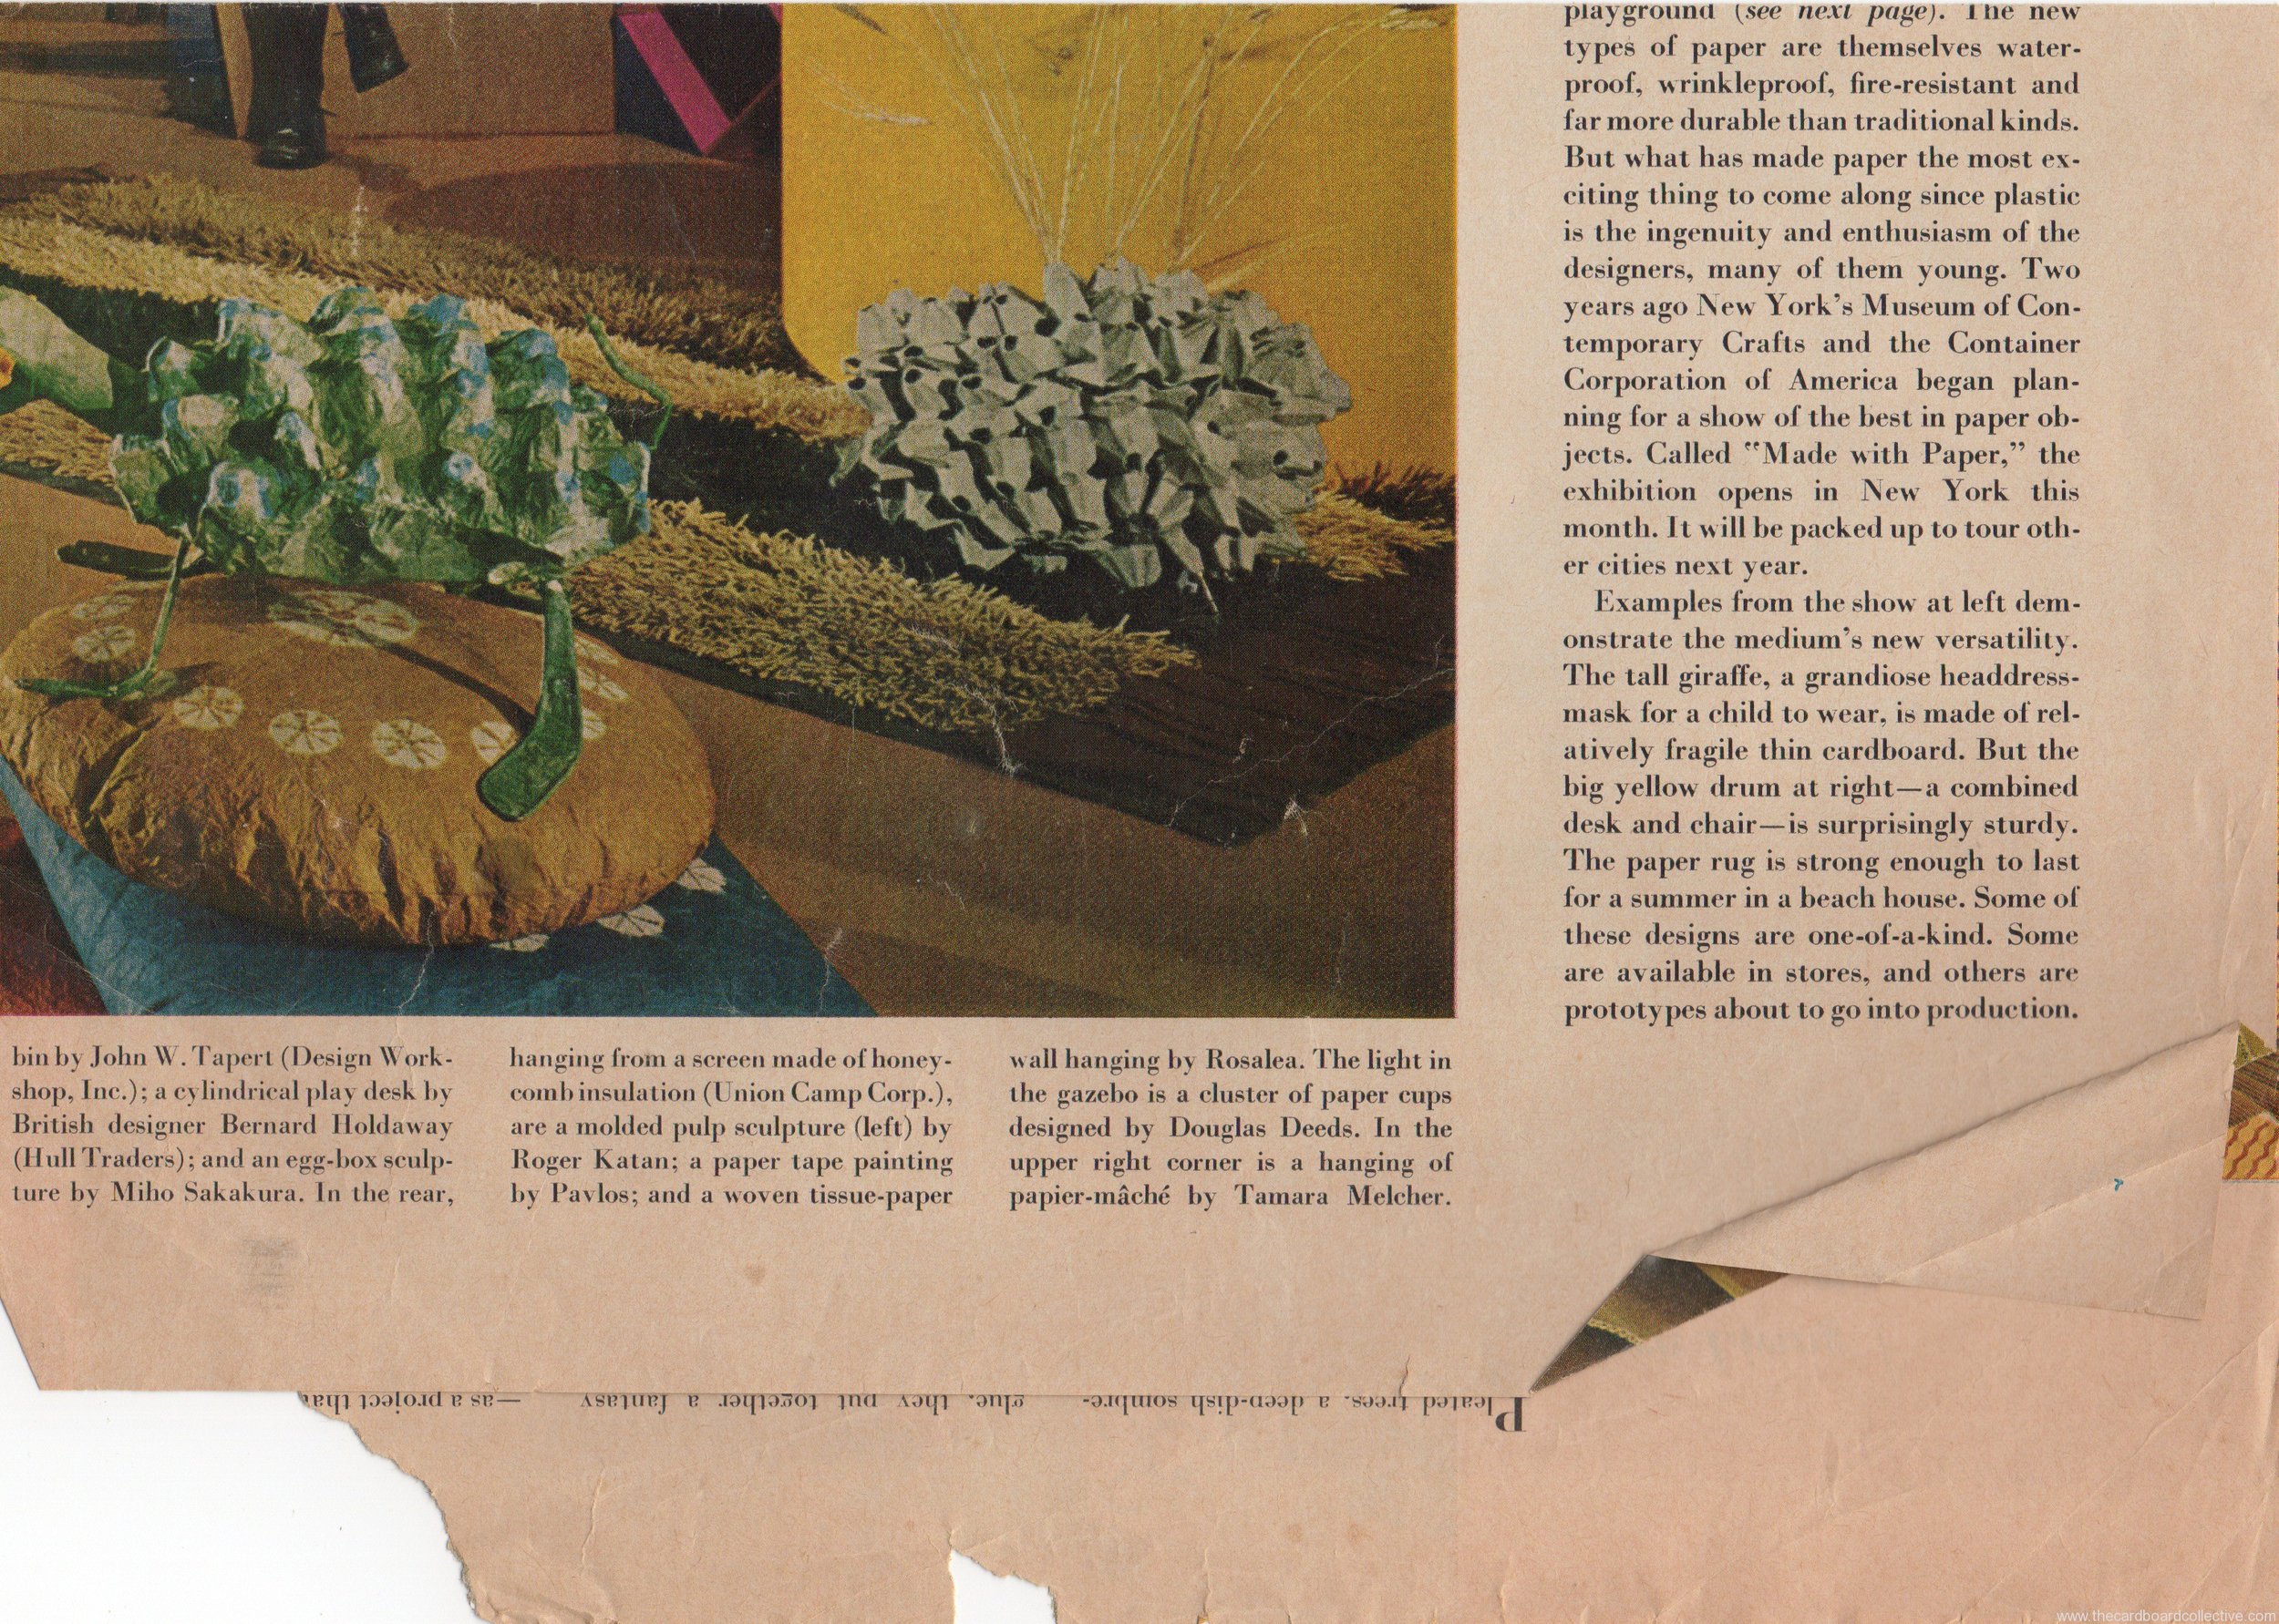
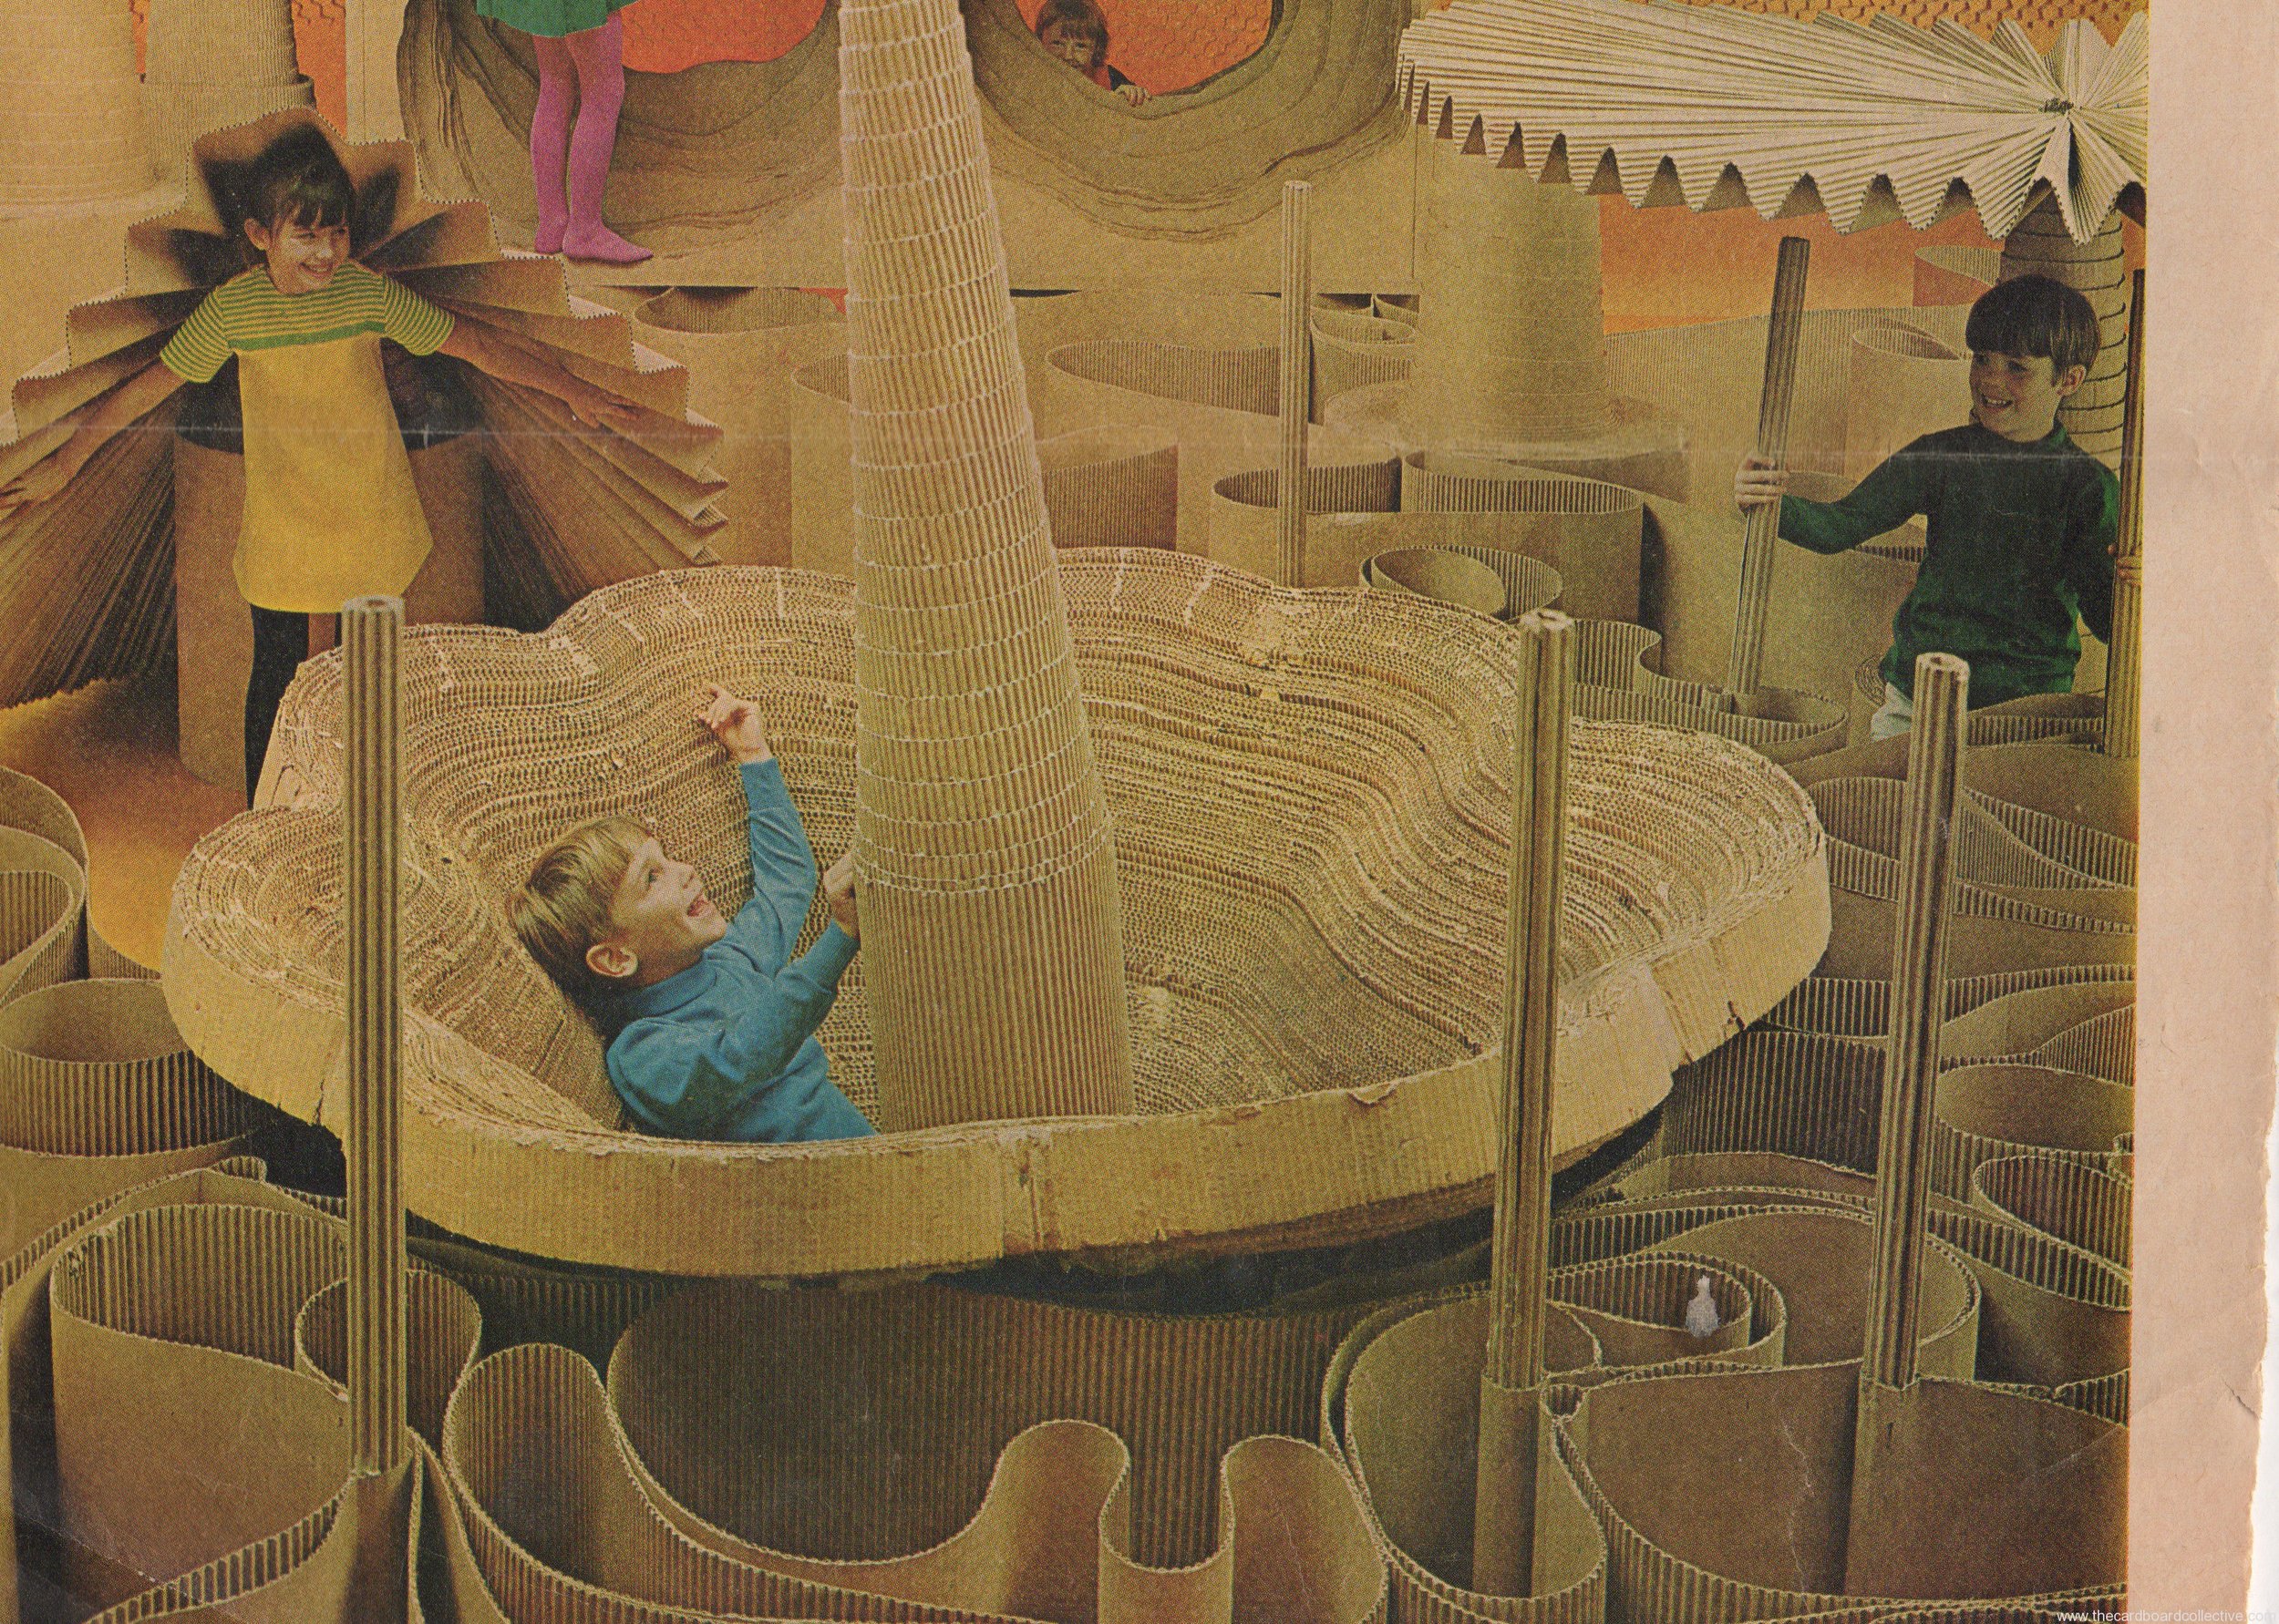
LIFE Magazine - November 3, 1967 (Volume 63, Number 18)
Cardboard Playground circa 1967
in Uncategorized, Play
Big Play back top Rescan
LIFE Magazine - November 3, 1967 (Volume 63, Number 18) Page 3

LIFE Magazine - November 3, 1967 (Volume 63, Number 18) Page 2
LIFE Magazine - November 3, 1967 (Volume 63, Number 18) Page 1
LIFE Magazine - November 3, 1967 (Volume 63, Number 18) Modern Living -- The Big Play in Paper, from Giraffes to Gazebos
Wow, check out this 1967 LIFE magazine article entitled, "The Big Play in Paper", that was lovingly rescued and scanned by my friend Miss Meryl Ann Butler during a recent Spring cleaning.
Meryl Ann and I met while taking online classes from Diane Gilleland at Crafty Pod, (I learned almost everything I know about blogging from those classes) and I got to know Meryl Ann by her spit-your-tea-out-hilarious sense of humor and from the really helpful stuff she posted in the forums (she has a long and distinguished career in the craft industry.) She is the author of the book 90 Minute Quilts among, many others and she has an intensely joyful, vibrant style with a personality to match.
Meryl Ann recently sent me an email message explaining that:
"This clipping was in my "morgue file" which was a file we had in the olden days before electronic files… with clippings of images that might inspire future artwork. My file had thousands of clippings, and I just threw most of it away a couple of days ago - a hard thing to do, since I had collected images for a long time - well, at least from 1967, lol! I only saved a couple of them, and of course the second I saw this I thought of you, Amber!"
How very thoughtful, and how entirely awesome. Enjoy a trip back to the glory days of cardboard......................we'll relive them again soon?

Beautiful DIY Cardboard Storage is HERE!


All I can say, is it's a great feeling to start with an idea, work with it for more than 6 months, and get to this place.
I'm so excited to share
with you! It started basically as a way to solve a problem I was having:
How do I organize my kid's toys? (the little ones)
which led to other problems:
How can I make something that's just right for them?
How can I make it out of cardboard?
How can I make it strong?
How can I make it recyclable?
How can I make it beautiful?
Well, curiosity can lead you down a long and winding path.
Mine included a re-acquaintance with high school geometry, learning more about photography and lighting, the search for affordable copyright free music, video editing, cardboard sourcing, explorations in color and pattern (ultimately inspired by the divine Japanese kimono), tool and material testing and lots and lots of watching kids play (the best part)!
I ended up with
A set of sculptural stacking boxes (the base of one box fits the top of another) that double as a nightstand, stool, ottoman or table and stool set for children. You can leave them plain, or decoupage them with decorative paper.
What do you do with them?
Put your favorite stuff inside. Yarn, yo-yos, matchbox cars and trucks, Legos, rubber stamps, fancy hats, scarves, alphabet magnets, musical instruments, play-dough, cookie cutters, wooden blocks...
I don't exactly understand the magic, but my kids love cleaning up with the Totem Boxes. They make sorting the toys like another way to play. You can easily move the boxes to where the mess is because they are modular, and then stack them up as you go. They look good sitting in the corner of your room, if you do nothing else. To me, they are functional sculpture.
And they're not just for kids. Someday when I'm a knitter, I'm going to make a set with a hole on the side for the yarn to feed out while I knit. I'll prop up my heels on the boxes as I relax and make gorgeous socks....
But are they durable enough for kids to use?
Months of testing and strength to support the sitting weight of a 150lb. adult makes me say YES.
What do I need to make them?
You will need lots of strong cardboard (like the kind that banana boxes or diaper boxes are made out of) and basic supplies like a pencil, white glue, a metal ruler, binder clips or clothespins and a utility knife. You will also need access to the internet, a computer and a printer to print out your pattern pieces and directions.
How long does it take?
Anywhere from 45 minutes to an hour for the first box, but after making about 20 of them, I've got it down to about 30 minutes a box (without decoupage). Best thought of as a weekend project. Say, if you wanted to make an amazing gift for your 2-5 year old niece or nephew's birthday.
Where can I buy the pattern?
The pattern costs $12 and is currently available in my Etsy Shop: https://www.etsy.com/shop/cardboardcollect
It includes instructional PDFs in US Standard and Metric with written directions and a pictorial guide with links to 3 original video tutorials. The elementary school teacher in me did my best to appeal to audio and visual learners, so if you get frustrated by traditional patterns, fear not.

A Cardboard Glue Comb & Sneak Peak
in Uncategorized, Make


I'm in the final stages of pattern testing my first cardboard furniture pattern! While my husband sweetly refers to this step as the first pancake, I feel like I have flipped so many many pancakes already!
Last week I was on a mad search to find a glue comb (oddly a tool that is uncommon in the U.S.) to put in (yay!) my new Amazon Affiliates shop. A putty knife was the closest stand-in I could recommend. Then my brilliant pattern-testing mother told me about the piece of cardboard she cut from the handle of a box to make into a glue spreader.
Wonderful, I thought, one less product; one less thing to buy. But I was surprised at how well this solution really worked when I modified it slightly by removing a strip of paper to expose the corrugations. Identical glue stripe-ing!
If you make a second glue comb you can use the two combs to clean each other before the glue dries, otherwise just trim off the end and then cut another strip to make more corrugations.
OK, I'm in the home stretch now, hopefully I'll have the pattern up any day now (whew!), and here's a little sneak peak for all of you who follow the blog:


Cardboard & Cap Peg Rack
Now that my daughters are almost 2 and almost 4 they've started borrowing my jewelery. I'm not quite sure what that means about my taste in jewelery, but they are scaling my 4 foot high bookshelf to get to it. As a compromise, I've decided to sacrifice access to some of my sturdier, more sought after necklaces in the hopes of safeguarding some of the more fragile and precious stuff.

Contraband jewelery stuffed into little boxes, purses and paper bags was popping up all over the house.... as if a colony of Leprechauns had taken up residence. In an effort to deter further looting, I bargained that some kind of necklace depot would distract them....
I started with just one box, which gave me 6 lengths of cardboard approximately the same length. I then assembled my caps.
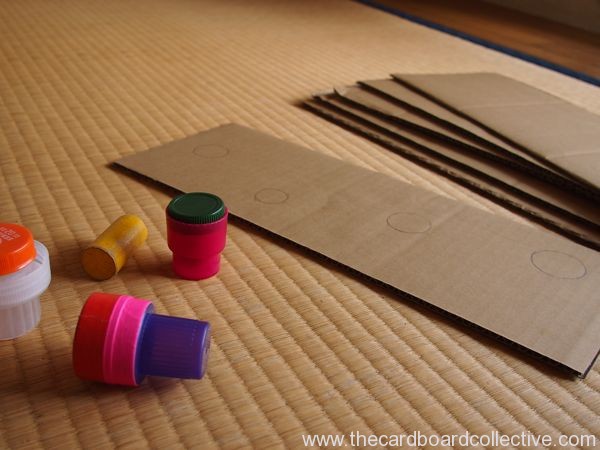

I had a variety of laundry soap and maple syrup caps and some of the caps magically fit together, but some did not. I ended up using Washi tape to secure them. I didn't have enough caps, so I borrowed a cylindrical block from the block bin. You can use whatever you have on hand for this project, it doesn't have to be plastic caps. Blocks, corks, tiny plastic or glass bottles; all can do the job.
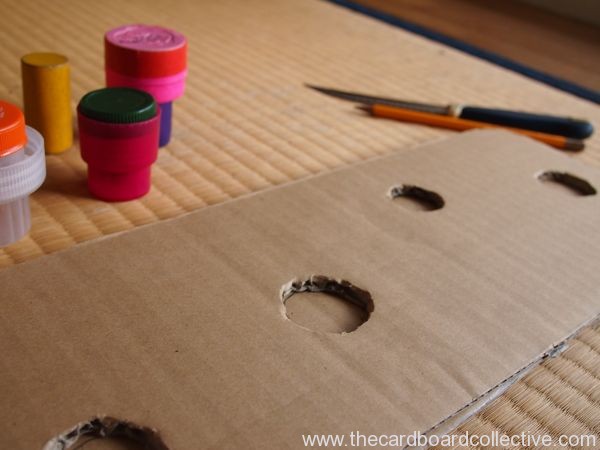
Next step was arranging the caps and tracing around them. I used a box cutter to carefully cut around the circles on the top layer, and then a serrated knife for the layers below. It's helpful to try and cut just inside the area that you traced for a snug fit.
Last step was gluing the layers together. I used one layer as a backing and didn't cut any holes in that layer. I also spread a thin layer of glue slightly diluted with water over the top piece of cardboard to preserve it and keep it from showing dirt and fingerprints. To hang the rack I threaded paper cord through the corrugated channels and tied it off.


Spring Planting in Cardboard


Last year I started experimenting with planting in cardboard even though nearlyeveryone around thought I was crazy. Well, not one of them was shy when the time came to harvest our cherry tomatoes...
This fall I made a simpler kind of planter utilizing the planter hangers that I have, and torn pieces of scrap corrugated cardboard tucked and layered inside. They over-wintered well, and to freshen the boxes up in the Spring, I just added new cardboard to the outside edges and removed some of the inner layers.
Spinach, salad greens, cilantro and nasturtiums...we can't wait for our little sprouts to start popping up! And we're curious to see how our experiment with the glass case (Used for displaying traditional Japanese dolls- there are always tons of these at the recycling shop) works for our tomato starts. We're hoping to transform it into a home for adopted caterpillars......

Cardboard Kid's Chair Makeover
Our beloved cardboard kid's chairs are almost 3 years old. They've been in desperate need of a makeover for a while now, and I thought those of you who read the blog would be interested in seeing how cardboard furniture wears over time.
These chairs are regularly used as vaulting boxes by my two little ones so I can't imagine a better stress test.
I started by addressing the corners that had worn, and cut small strips of cardboard to use as shims.
I glued them into the worn areas to give the chair corner rigidity again and reshape the edge.
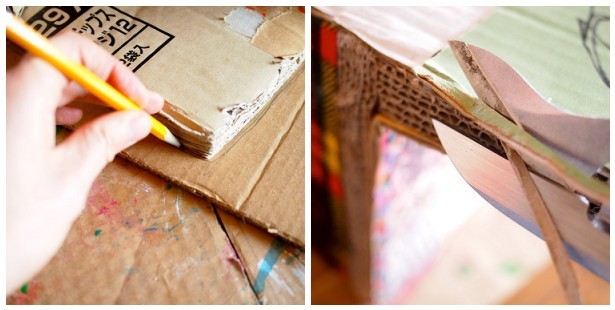
Next I trimmed off any loose cardboard and traced the different pieces of the chair one at a time onto (new) post consumer cardboard and cut the pieces out. After some gluing and clamping, this is what we got:

Not bad huh? Almost as good as new......and the chairs will be even more smashing after we treat their exteriors to a new look:
.....catch that in my next post.

Stackable Cardboard Dressers for Kids
My daughters are young and their needs are always changing. They wear a pair of shoes for 6 months then need a new pair.
They use a little chair, or a booster seat for a year or a month or 2 and then we have to replace it and either throw out the old one, find a friend who happens to need the same thing at the same moment we want to get rid of it, or put it on Craig's List. (We have no charity shops here in Tokyo and limited recycling opportunities for large items.)
I find this kind of turnover exhausting. I wanted to create a dresser system for the girls that accomplished 3 things:

Recyclable so that we could recycle the whole thing, or just parts of it as the girls' needs changed. I didn't want the guilt of throwing away something that was perfectly good and I didn't want the extra work of finding someone to take on our old stuff.
Facilitates Independence. I wanted a piece of furniture that was easy to use and functional so the girls could easily pick out their own clothes and put them away starting from an early age (about 18 months-2 years ).
Beautiful. I believe that the things in our life should be beautiful and functional. I want my daughters to value beauty, design, the arts, and momma moxie, so we tried to accomplish all of those things when we made the dressers. If you like hot pink and pattern as much as I do I hope you agree on our definition of beautiful....

To make the dressers, we collected kiwi boxes over the course of a few weeks, as well as beautiful papers; a mix of washi papers, origami paper, paper bags and Gallery Opening flyers.
I then decoupaged the papers onto the fronts of the boxes with water and white glue. I made a door in each box by cutting two sides about a ruler's width from the edges of the box, and and then scored the bottom to create the door opening.
The doors of the dressers always stay shut and close easily. In a year and a half of using these boxes, the doors have never flopped open or gotten flimsy.
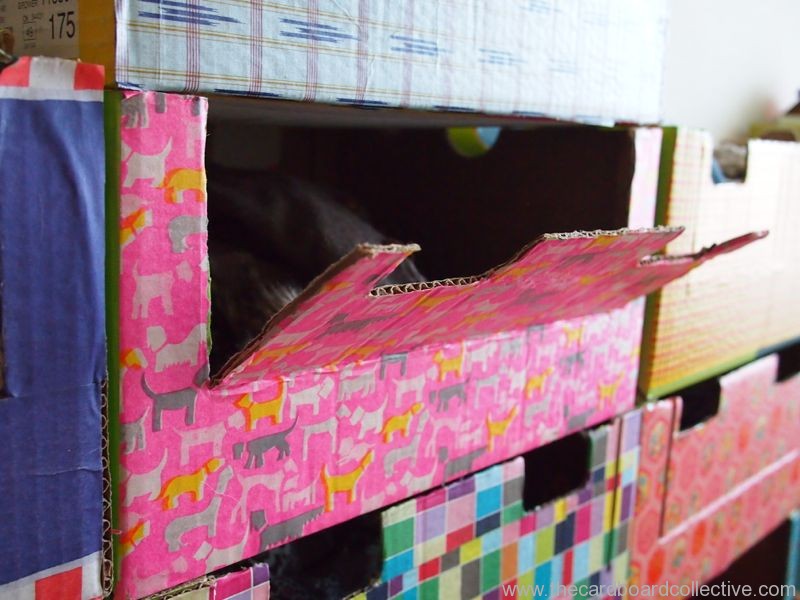
The girls can easily open and close the drawers. By decorating each box differently they quickly have memorized what kind of clothing each box holds. (Only Dad is still struggling with this.)
Another benefit of these dressers is that they are not a hazard if they fall over in the event of an earthquake - an important consideration living here in Japan.

If you're wondering where you can get kiwi boxes, check out your local produce department. This past summer I wrote a post about how to find free cardboard here. We also use these boxes for storing our toys, puzzles, and art supplies. Yes, kiwi boxes are a definite favorite here in our apartment.

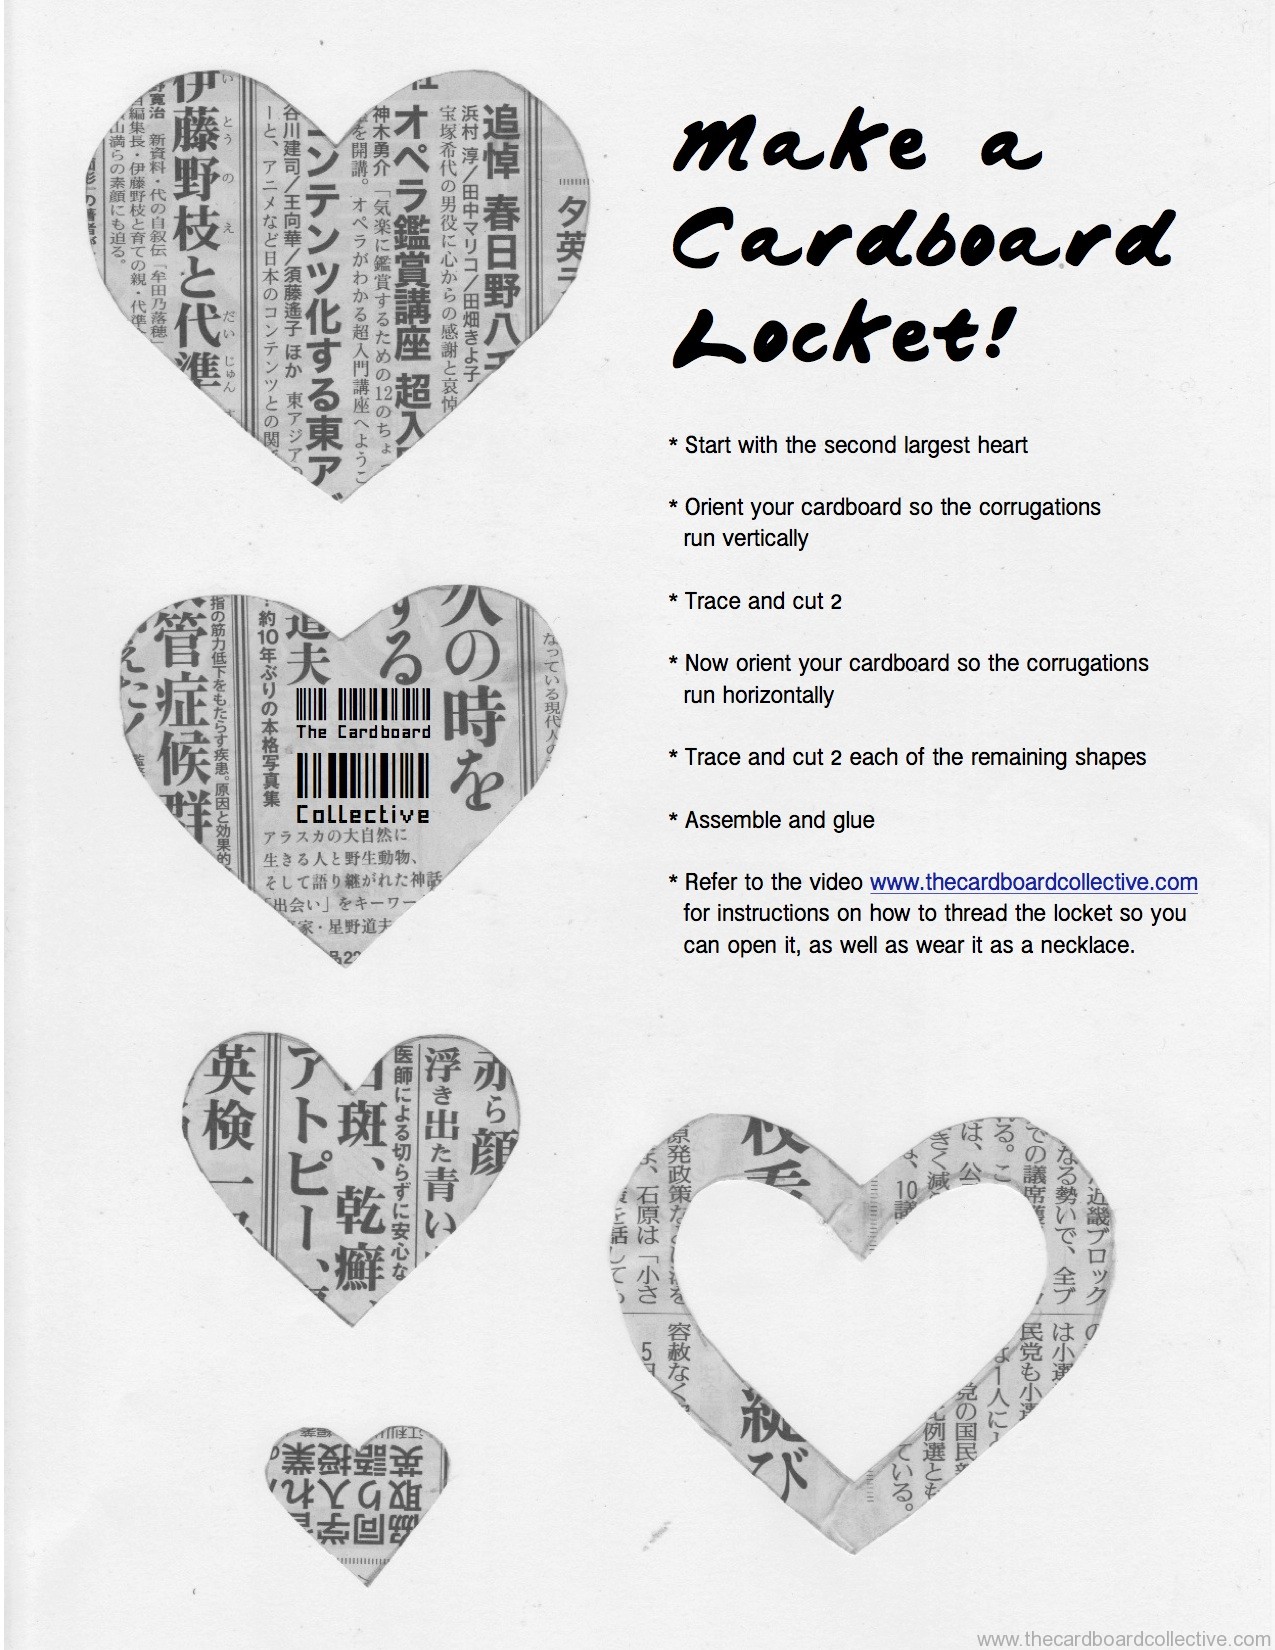
Cardboard Heart Locket
When my daughter was about 18 months old, we went on a trip to an island off of Tokyo's coast called Shikinejima. It was the off season, most restaurants were closed and we were sleeping in a tent.
We ended up doing a lot of shopping at convenience stores, eating meals of: apples, Oreos, cans of hot cocoa, and cans of tuna fish, and were even gifted a fresh bag of assorted seafood from a local fisherman, which we hesitantly attempted to cook over a fire... Maybe you've had a similarly strange almost-camping experience?
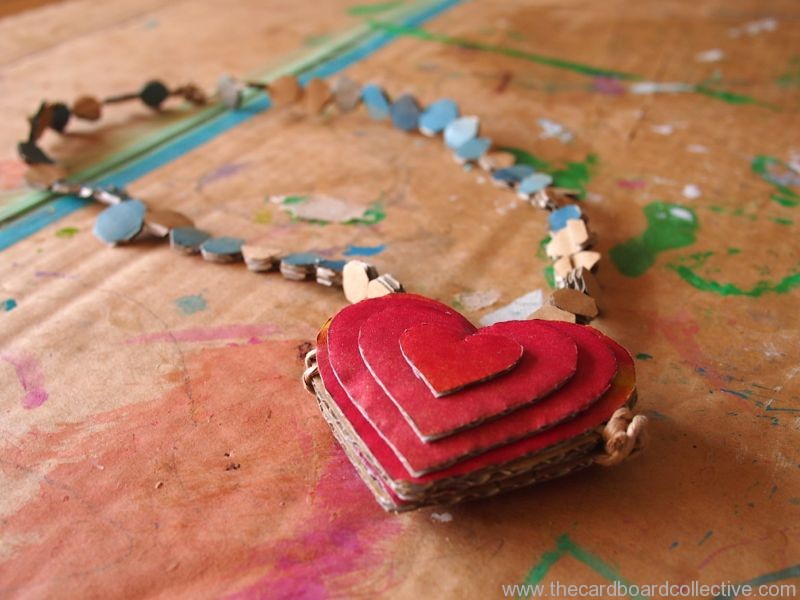
One of the shop keepers, a little old man who was so enamored with our daughter and her blond hair, kindly gave her a red plastic 3D heart pendant which had a light inside that would blink on and off.
It was one of those toys with sticking power, and became well-worn and well-loved over the next year and a half- that is until the battery died.

When I saw this cardboard heart ornament on Pinterest by A Little Learning for 2, it gave me the idea for making a low tech replacement for the blinking heart pendant.
My daughter approved. She loves being able to open and close the locket. We're now working together to make something similar as a Valentine's Day present for the grandparents. Definitely not afraid to share the cardboard love....
Info on adding cardboard beads to your locket here.